iOS 18 Notes App: Record & Transcribe Audio Effortlessly
In iOS 18 and iPadOS 18, adding an audio recording to a note just got a whole lot easier. You can now record directly in the Notes app and even generate a written transcript if you want. Here’s how it works.
Before iOS 18, adding audio to a note was a bit of a hassle. You had to open the Voice Memos app, record the audio there, and then manually attach the file to a note. Now, the process is built right into Notes—but it’s a little hidden unless you know where to look. The biggest upgrade? If you have an iPhone 12 or later, the app can transcribe your recordings into text.
However, there’s a catch—the transcription feature currently supports only English, including US, UK, Australian, Irish, New Zealand, and South African versions. Even so, this update is a game-changer for students, professionals, and anyone who needs a quick way to capture and review spoken information. Having a written version of a meeting, lecture, or brainstorming session makes it easier to organize thoughts, pull out key points, and track action items.
Of course, keeping the original audio is still useful. Like with audiobooks, listening to a speaker’s voice adds tone, emphasis, and context that a transcript alone might miss. While the transcription feature isn’t flawless, it makes notes more valuable and shareable. Plus, if your device supports Apple Intelligence, it can automatically summarize the transcript for you.
Recording in the iOS 18 Notes App
To record audio in Notes:
- Open a new note.
- Tap the plus (+) button at the bottom right, just above the keyboard.
- Select the attachment button from the pop-up tools.
- Choose Record Audio from the menu.
This will open a recording screen similar to the one in Voice Memos (which is still available as a separate app). To start recording, tap the red button at the bottom of the screen. Make sure your iPhone’s mic is picking up your voice.
- Need a break? Pause the recording and resume when you’re ready.
- Done recording? Tap the record button again to stop.
To get a live transcription while recording, tap the word bubble button with quote marks next to the record button. If you prefer, you can wait until after recording to generate the transcript.
Adding and Editing the Transcript in iOS 18 Notes App
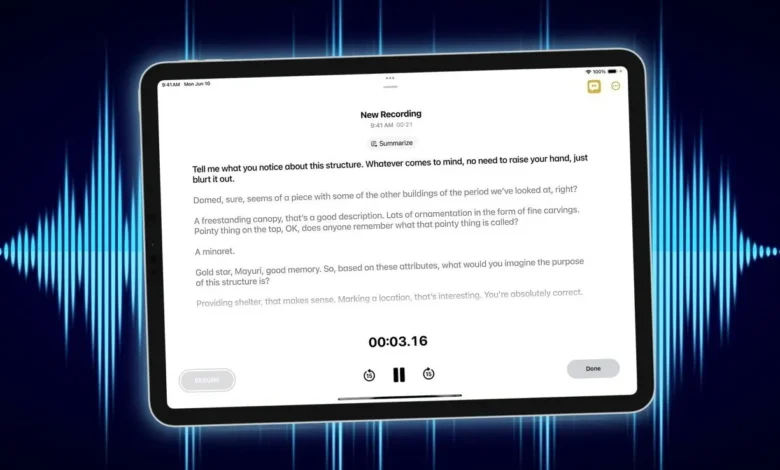
After recording, tap Done (next to the record button) to generate the transcript. The transcript will appear as a gray audio block in the note, showing the first few lines of text along with a play button.
To add the transcript to your note:
- Tap the three-dot menu in the top right.
- Select Add Transcript to Note.
- Edit the transcript as needed to fix any errors.
If you want to use the transcript elsewhere, you can choose Copy Transcript from the same menu and paste it into another app, like a word processor or blog post.
Compatibility and Extra Features
You can record and transcribe audio on any iPad that supports iPadOS 18 or later. Mac users with an M1 chip (or later) running macOS Sequoia can also use this feature.
If your Mac supports Apple Intelligence, you get additional tools to summarize, proofread, or rewrite transcripts right inside the Notes app. Apple Intelligence is available on:
- iPhone 15 Pro and Pro Max, and all iPhone 16 models
- iPads with an A17 Pro or M1 chip (or later), running iPadOS 18
- Macs with an M1 chip (or later), running macOS Sequoia 15.1 or newer
With these updates, Notes is more powerful than ever. Whether you’re jotting down ideas, capturing meeting discussions, or keeping track of lectures, audio recording and transcription make it effortless to save and revisit important details.